The goal of this article is to explain how the eCash Avalanche protocol works, and give basic step-by-step instructions for getting started.
After reading this article, the reader should be able to:
- Understand the basics of how eCash’s Avalanche protocol works
- Understand the role of Proofs, Delegations, and Nodes
- Become familiar with the Electrum ABC Proof Editor
- Generate your own Avalanche Proof
- Use your Avalanche Proof to run a Bitcoin ABC node with Avalanche enabled
In addition to this tutorial, there are also video guides explaining how to set up an eCash Avalanche node using a Virtual Private Server, and how to create a Stake Proof for your eCash Node.
Note: There are no staking rewards at this time. Creating a Stake Proof simply allows you to run an eCash Avalanche node and have that node participate in Post-Consensus. This benefits the eCash network, and gives you some influence over consensus formation to decide which blocks are finalized in Post-Consensus. But it does not result in direct rewards from staking.
What is Avalanche?
Avalanche is a network protocol whose main property is to provide fast convergence between the participants. These participants are requested to vote on items and will eventually flip their position according to the vote result. Once a vote is conclusive, there is no way back and the voted item state is considered final. Avalanche provides a Byzantine fault tolerant protocol with well defined safety guarantees, as laid out in its white paper.
In the context of eCash, the Avalanche protocol is being used in conjunction with the Nakamoto consensus. This means that all items being voted on must follow the consensus rules, and Avalanche can take care of solving the conflicts. There are several uses cases where the Avalanche protocol brings improvement to the Nakamoto consensus:
Post-Consensus: this refers to the decisions that occur after a block gets mined. This includes voting on the blocks to prevent reorgs.
Pre-Consensus: this refers to the decisions that occur before a block gets mined. This includes voting on transactions to prevent double spends.
The eCash network roadmap plans for both the above mechanisms and more. At this stage only Post-Consensus is implemented.
Stake Proofs
While the Avalanche protocol itself has well defined safety guarantees, it requires some sort of method for Sybil resistance. In order to provide this Sybil resistance, the eCash avalanche network requires that every Peer that participates in Avalanche voting has an associated “Stake Proof”. More than one Avalanche Node can be associated with the same Proof, and from the perspective of the Avalanche voting protocol, the group of nodes associated with the same Proof is called an “Avalanche Peer”.
The Proof provides Sybil resistance by being associated with eCash coins (UTXOs). The Proof contains signatures from the private spending key for those coins. This means that only the person who knows the private key for the coin can add Stakes to the Proof. One Proof can be tied to many coins, which means that the coins don’t have to be moved in order to create the Stake Proof.
The mechanism by which Nodes are associated with a Proof uses Public Key Cryptography in which the Node signs messages that prove it possesses the private key corresponding to the Proof, known as the “Proof Master Key”. To facilitate key management, there are also “Delegations” which allow different nodes associated with the same Proof to use different keys. The relationship between Coins, Proofs, Delegations, and Nodes is shown below:
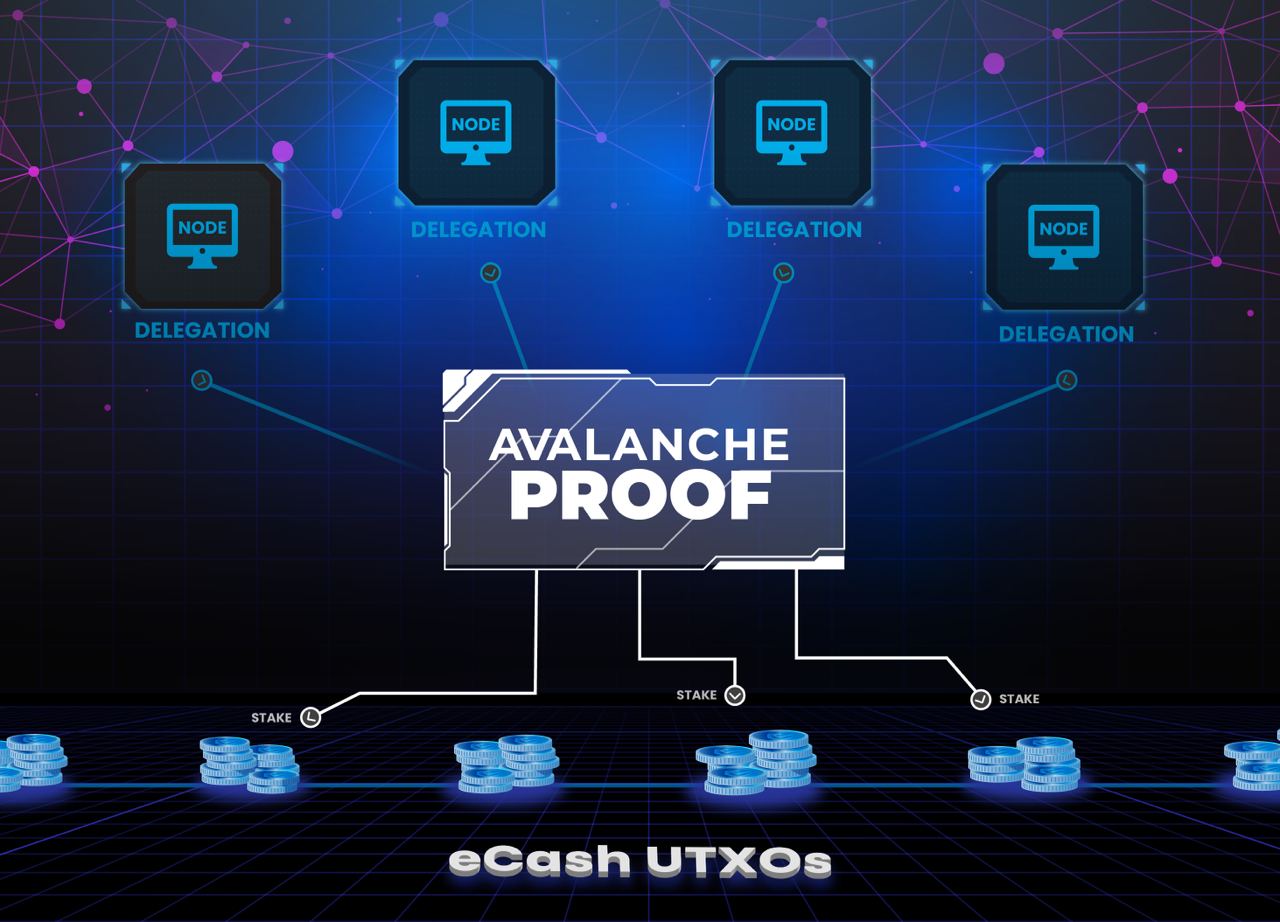
Note the one-to-many relationship between Nodes, the Proof, and staked coins (UTXOs) in this image. One Avalanche Proof can be used by several different eCash nodes. This is useful for providing redundancy, geographic diversity, and load balancing. Each Node, however, can only use one Proof. If you wish to use several staked coins with the same Node, even coins held in different wallets by different people, this can be done by adding all the different coin stakes into one Proof.
Proof Format
The Avalanche Proofs contain information within them in various fields as follows:
Proof Sequence: This number is intended to be used when you want to replace a proof with another one. Once a UTXO has been embedded into a proof, it cannot be part of another proof. If 2 or more proofs are claiming the same UTXO, then the following rule applies:
- If the proof public key is identical, the highest sequence number takes precedence.
- If the public key differs, the total staked amount takes precedence.
- In practice, it is advised to use a sequence number of 0 for building your proof. Then if at some point you intend to make another one, for example to include more coins, you can increase the number to 1 to let the network know that it’s a deliberate move. Note that your earlier revision proof will be invalidated by the network and you should update all the nodes using it to the new revision.
Expiration: This sets a time at which your proof will be considered invalid.
Master Public Key: This is the Master Key for the Proof. When generating a new Proof, Electrum ABC will
automatically generate a Private Key from the wallet’s derivation path at .../2/0. The associated Public Key
is included in the Proof. This Key is used by the Avalanche Node to prove that it has authority to participate
in the protocol as a Peer representing this Proof.
Payout Address: This is a valid XEC address that will be used to send the staking rewards (not available yet). Can be any standard type address that you own and want the coins to be sent to.
Stakes: This is an array of the UTXOs to be attached to the proof. There are some limitations to these UTXOs:
- Limited to 1000 UTXOs per proof.
- Each UTXO must have an amount greater or equal to 100 MegXEC (aka 100,000,000.00 XEC).
- Each UTXO must have 2016 or more confirmations in the blockchain. This means that the coin must not have moved within the previous 2 weeks.
- Only P2PKH UTXO type is supported, you cannot stake P2SH (often used for multisig) coins.
Generate a Proof using Electrum ABC
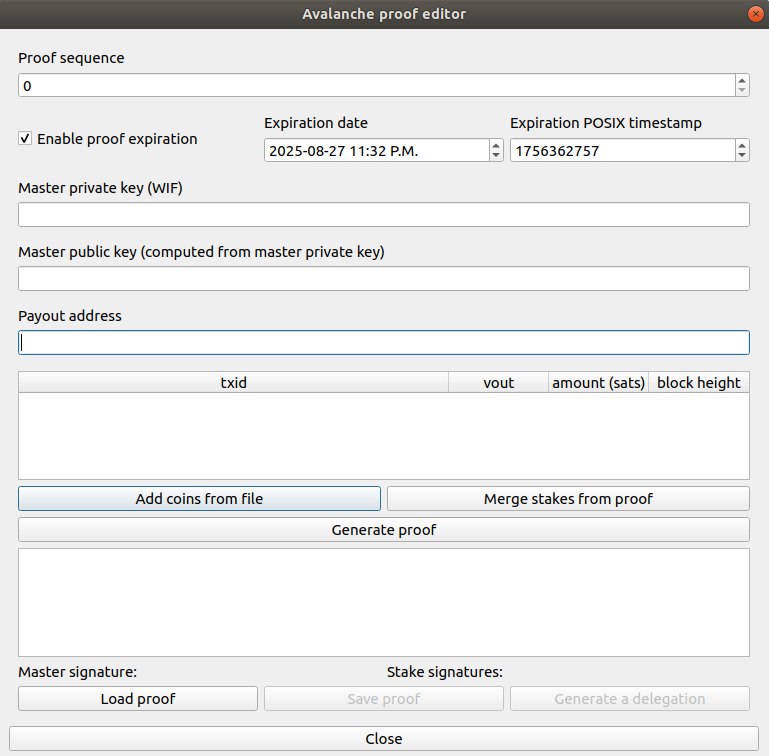
As of version 5.1.5, Electrum ABC includes the Avalanche Proofs Editor for use with eCash Avalanche. The Proof Editor is a general tool that can be used to generate new Proofs, as well as load existing Proofs to inspect their contents and modify them to create new Proofs. For example, you could load an existing Proof, and add coins from the wallet to stake in the Proof.
In this tutorial, we will use two Electrum ABC wallets, along with the Proof Editor, to generate a Stake Proof. The reason for using two wallets is to keep the coin spending keys separate from the wallet that controls the Proof Master Key. This allows the Private Keys associated with spending the coins to be managed securely. The instructions here will assume that you are using an offline computer for the coin-holding wallet.
In order to manage these wallets separately, we will create Proof in a 3-step process:
- In the Proof wallet, create a skeleton Proof.
- In the Coin-holding wallet, add Stakes to the Proof.
- In the Proof wallet, sign the Proof with Proof Master Key.
Step 1: Create the Skeleton Proof
This step is done on a regular computer connected to the internet. This will create a wallet that can be used to manage your Proofs, and create Delegations if you decide to do that later. Simply follow these steps:
- Create a new wallet. This will be your “Proof wallet”.
- Open Tools > Avalanche Proof Editor.
- Review the fields and adjust them if desired. For example, you may want to change the Payout Address to one in another wallet, or adjust the expiration time.
- Click Generate proof.
- Save the Proof.
Step 2: Add Stakes to the Proof
Online portion:
- Open a watch-only version of your coin-holding wallet. For example, this could be your regular Trezor wallet within Electrum ABC.
- Open the ‘Coins’ tab, select the coins you want to stake, right click and click ‘Export coin details’ to export coins file. Make sure the coins you select meet the requirements for Staking: each coin must be at least 100,000,000.00 XEC and have at least 2016 confirmations.
For the next steps, move to an offline computer. For example, you could use a “Live CD” to temporarily recreate your hardware wallet (Trezor or Ledger) within Electrum ABC, without saving the wallet or connecting to the internet. When moving to the offline computer, the information you will need is:
- Electrum ABC 5.1.5
- The saved Proof
- Coin details file
You can save these to a memory stick for use on the offline computer.
Once you have recreated the coin-holding wallet on your offline computer, follow these steps to add your coins as Stakes in the Proof.
- In the Proof editor, click on the “Load proof” button.
- Click OK on warning. It’s OK that this wallet doesn’t have the Proof Master Key, it just means you won’t be able to sign the final Proof at the end from this wallet.
- Add coins from the Coin Details file you saved previously.
- Click Generate proof.
- Click Save Proof, Click OK on warning. You will need to save the Proof to a memory stick, or other medium to transfer it back to your online computer.
- After the Proof has been saved, you can delete the wallet and/or wipe the entire offline computer.
Step 3: Sign the Proof with Proof Master Key
- Back on your online computer, open Avalanche Proof wallet again.
- Load the unsigned Proof that was saved from the offline computer (You should now see the private key in that field).
- Click on Generate Proof. This will actually sign the entire Proof with the Proof Master Key.
- Save the signed Proof
Now you have an Avalanche Proof, and can run an eCash Avalanche node!
Run an eCash Avalanche Node
To run Avalanche, use Bitcoin ABC version 0.26.0 or greater, and simply restart your node with the following added to your bitcoin.conf file:
avalanche=1
debug=avalanche
# Proof dependent parameters
avaproof=<your hex Proof>
avamasterkey=<your Master Private Key, WIF format>
(debug=avalanche is not strictly necessary, but will let you see Avalanche related message in your debug.log file.
This line can be omitted if desired)
Ensure the Node is Well Connected
One thing to note, is that the Avalanche protocol relies on the node being well connected to the rest of the network. This is quite different from Nakamoto consensus, which only needs enough connectivity to be confident that it can get the longest Proof-of-Work chain. For your Avalanche to function effectively, and be of greatest value to the network, check the following:
- It should accept incoming connections. If it is behind a firewall, adjust the firewall settings to allow incoming connections.
- Sometimes people run eCash nodes behind another “bridge node”. Running an Avalanche node with a Proof behind a bridge node is not helpful to the rest of the Avalanche network, since that node won’t be able to participate properly in Avalanche voting rounds.
- Make sure that the
maxconnectionsparameter isn’t set in your bitcoin.conf file. This can interfere with the proper functioning of the Avalanche networking code. - The Avalanche node should have high uptime, and be able to run continuously.
Adding a Delegation
Another consideration is the option of running multiple nodes using Delegations. To Delegate your Proof to someone else’s node do the following:
- Ask the node operator for a Delegation PubKey.
- Use Electrum ABC to Generate a Delegation to that PubKey by clicking “Generate a Delegation” within the Proof Editor.
Then the person running the Delegated node can use the same Proof without having access to the Proof Master Key, by adding these lines to their bitcoin.conf file:
avalanche=1
debug=avalanche
# Proof dependent parameters
avaproof=<the hex Proof>
avadelegation=<the hex Delegation>
avamasterkey=<the Master Private Key for the Delegation, WIF format>
Monitoring your Avalanche Node
Now that you have your node running, with Avalanche enabled and a Stake Proof, your node will be participating in the Avalanche protocol and helping to finalize blocks. You are now part of the network of Avalanche nodes that are enabling 1-block finalization, and protecting the network from 51% attacks.
To observe the status of Avalanche on your node, you can try some of the following commands:
./bitcoin-cli getavalancheinfo
./bitcoin-cli getavalanchepeerinfo
tail -n 100 ~/.bitcoin/debug.log
For more questions and to ask for help, you can join the eCash Discord. For questions and issues specific to the Bitcoin ABC node, try the eCash Development Telegram group. For questions and issues related to Electrum ABC, try the Electrum ABC Telegram group. To monitor development progress, see Avalanche.cash